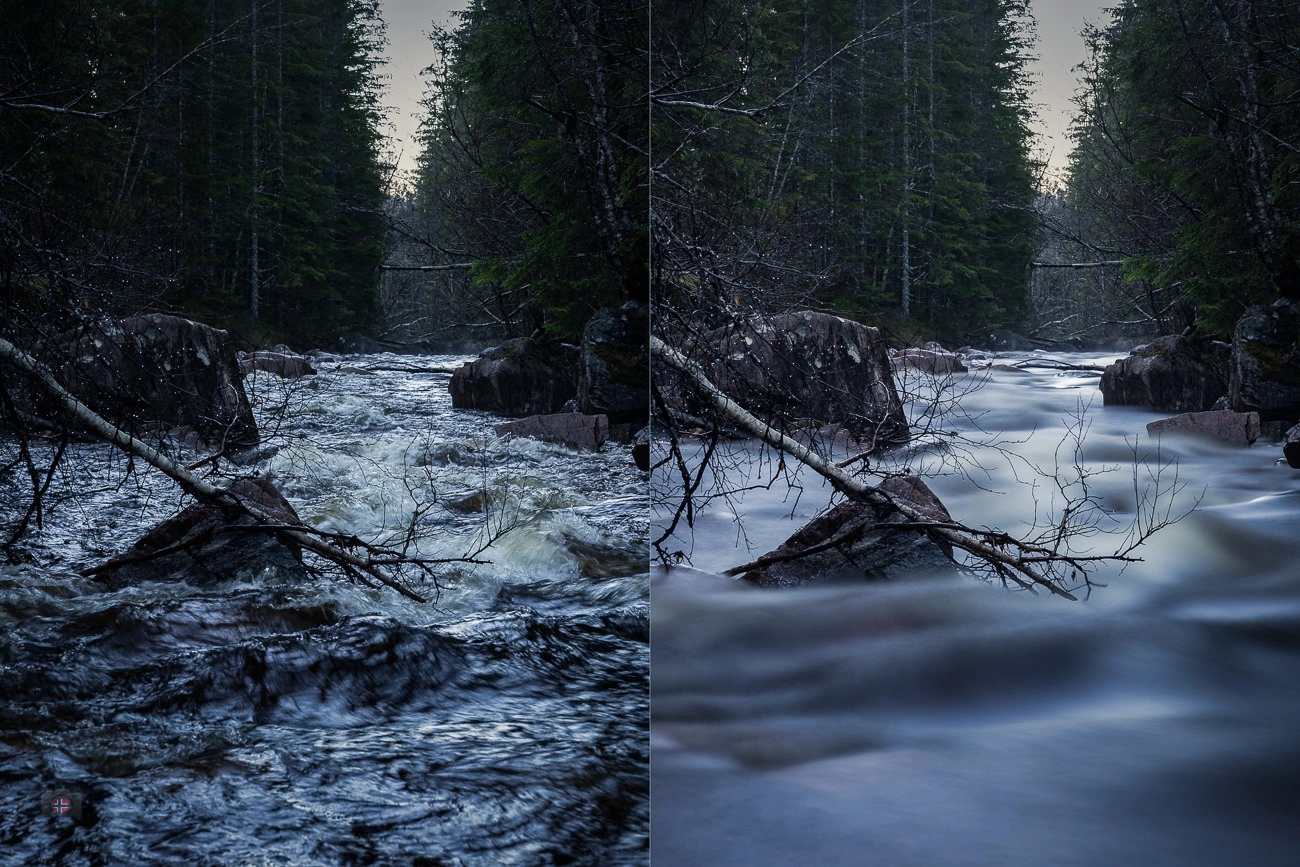
How do you photograph flowing water so that it looks soft, almost like mist? The key is the shutter speed. An ND filter reduces the light reaching the sensor so that you can use a longer exposure without overexposing the photograph. My featured before-and-after image shows the same forest river at two shutter speeds: on the left, the current remains wild and textured; on the right, it becomes a smooth surface. Both are my own photographs.
ND filter before and after: What changes in flowing water?
At this forest river, I tried both short and long shutter speeds. The fallen branches, dark rocks and trees stayed in the same place. The split featured image shows both results side by side. What changes is the way the water is recorded, not a landscape artificially altered afterwards.
With a shorter shutter speed, the water keeps its structure. Individual waves and the restless surface give the river energy. This comes closer to the way I experienced the current with my own eyes.
With a long exposure, as shown on the right side of the featured photograph, the movement of the water is recorded over a longer period. Many small waves merge into bright, soft areas. The landscape appears quieter even though the river flows just as fast. I like that contrast: nature has not changed, but the photograph tells a different story.
What does an ND filter actually do?
ND stands for Neutral Density. An ND filter reduces the amount of light passing through the lens to the sensor. Ideally, it does this without changing the colours. Because less light reaches the sensor, I can choose a longer exposure without overexposing the photograph.
There is an important distinction here: the filter does not make the water soft by itself. The long exposure creates that effect. The ND filter simply gives me more freedom to choose the shutter speed. At a dark river in the forest, longer exposures may even be possible without a filter.
Which ND filter for flowing water: ND8, ND64 or ND1000?
The number describes the factor by which the incoming light is reduced. ND8 extends exposure time by a factor of 8 (3 stops), ND64 by a factor of 64 (6 stops) and ND1000 by roughly 1000 (just under 10 stops). At a fixed aperture and ISO, each additional stop doubles the exposure time needed.
For flowing water, a very strong filter is not always necessary. A moderately long exposure can soften the current while preserving interesting details. Extremely long exposures, by contrast, may remove almost all visible texture. The right choice depends on the subject.
Which shutter speed makes water look soft?
There is no single shutter speed that works for every river. As a rough guide, very fast speeds freeze droplets and ripples. At around 1/15 to 1/4 second, the direction of the current often remains visible. Between roughly 1/2 and 2 seconds, the water tends to become noticeably softer. With exposures of several seconds, it may look almost smooth. The exact effect depends on how fast the river flows and how close the camera is to the water.
Example: From 1/125 second to about 8 seconds
Suppose the camera meters 1/125 second without a filter at ISO 100 and a fixed aperture. Keeping the same aperture and ISO, the calculated exposure times are:
- No ND filter: 1/125 second
- ND8: approximately 1/15 second
- ND64: approximately 1/2 second
- ND1000: approximately 8 seconds
This is an illustrative calculation, not the actual camera settings extracted from my two photographs. It shows why filter strength matters. If I want to preserve the natural lines of a current, the strongest ND filter is not automatically the right choice.
My approach to long-exposure photography
I start by choosing the composition and looking for fixed elements such as rocks, branches or the riverbank. They provide a point of reference for the moving water. Then I put the camera on a stable tripod, select a low ISO value and determine a normal exposure without a strong filter.
Only then do I decide how soft I want the water to appear. I choose an appropriate ND strength and calculate or test a longer shutter speed. With very dark filters, I focus before attaching the filter, as autofocus has less light to work with. A self-timer or remote shutter release helps prevent camera movement.
After taking the photograph, I check more than its brightness. Are the highlights clipped? Can I still see interesting lines in the current? Or has the river become a uniform grey surface? Depending on the answer, I may try a shorter exposure too.
When I prefer a short exposure
Not every moving body of water benefits from being smoothed. In a storm, beside breaking waves or at a wild stream, visible energy may be the most important part of the scene. An ND filter is not something I always attach to my lens. It is a tool for a particular idea. Very strong or stacked filters may also introduce colour casts or dark corners.
The photographic idea comes first
At this river, both approaches have their appeal. A short exposure conveys movement and force; a long one makes shapes and lines feel quieter. Neither is automatically the better photograph. The real question is which character I want to reveal.
I explore a related idea in my photography project When the Light Decides, where moving water, light and exposure choices also shape the images.
2 responses to “ND-Filter für Wasser: So gelingt die Langzeitbelichtung”
-
Lieber Dirk,
in deinem Beitrag hast du die Wirkungsweise eines ND-Filters sehr gut dargestellt. Für mich ist es ein tolles Gestaltungsmittel.
Liebe Grüße, Horst

Leave a Reply